
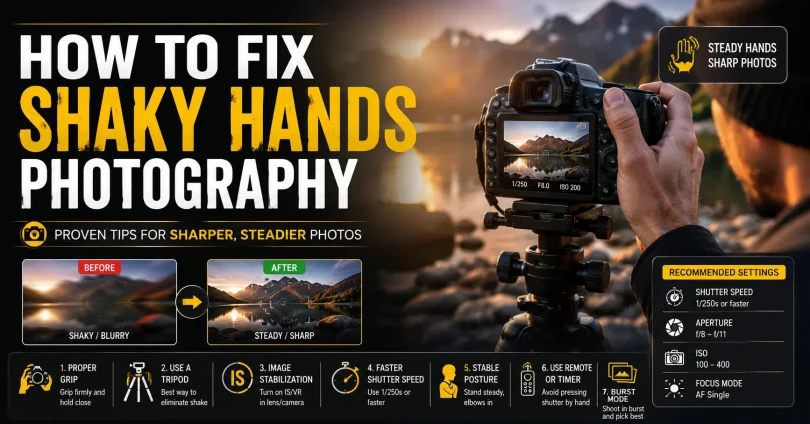
How to Fix Shaky Hands Photography.
You frame the perfect shot, press the shutter, and then you see it: a soft, blurry image that should have been sharp. Shaky hands are one of the most common and frustrating problems in photography, and they affect beginners and experienced shooters alike.
The good news is that camera shake is almost always fixable. Whether you deal with occasional hand tremors, shoot in low light, or use long telephoto lenses, there are clear, proven strategies that will help you capture tack-sharp photos consistently.
This guide covers everything your competitors do not: the science of camera shake, practical body mechanics, camera settings, the right gear, genre-specific advice, physical training exercises, and how to recover slightly blurry images in post-production.
What Is Camera Shake and Why Does It Ruin Photos?
Camera shake is the unintentional movement of your camera during the moment of exposure. Even a tiny shift of a millimeter can translate into visible blur across your entire image, especially at slower shutter speeds or longer focal lengths.
Understanding camera shake begins with understanding how shutter speed and focal length interact. Every lens has a minimum recommended handheld shutter speed, known as the reciprocal rule: your shutter speed should be at least 1 divided by your focal length.
For example:
- A 50mm lens needs at least 1/50s handheld
- An 85mm lens needs at least 1/85s, ideally 1/100s
- A 200mm telephoto lens needs at least 1/200s, ideally 1/400s
- On a crop sensor camera, multiply the focal length by the crop factor first (e.g. a 50mm lens on an APS-C body behaves like 75mm, so you need at least 1/80s)
Camera shake is different from subject motion blur, where the subject moves while the background stays sharp. With camera shake, the entire image blurs uniformly because the camera itself moved.
What Makes Camera Shake Worse?
- Using telephoto or zoom lenses at long focal lengths
- Shooting in low light, which forces slower shutter speeds
- Physical fatigue, stress, or caffeine
- Cold weather, which tightens muscles and increases tremor
- Holding your breath too tightly, which actually increases micro-tremors
- Heavy camera-lens combinations held extended away from the body
- Medical conditions such as essential tremor or Parkinson’s disease
How to Hold Your Camera Correctly to Minimize Shake
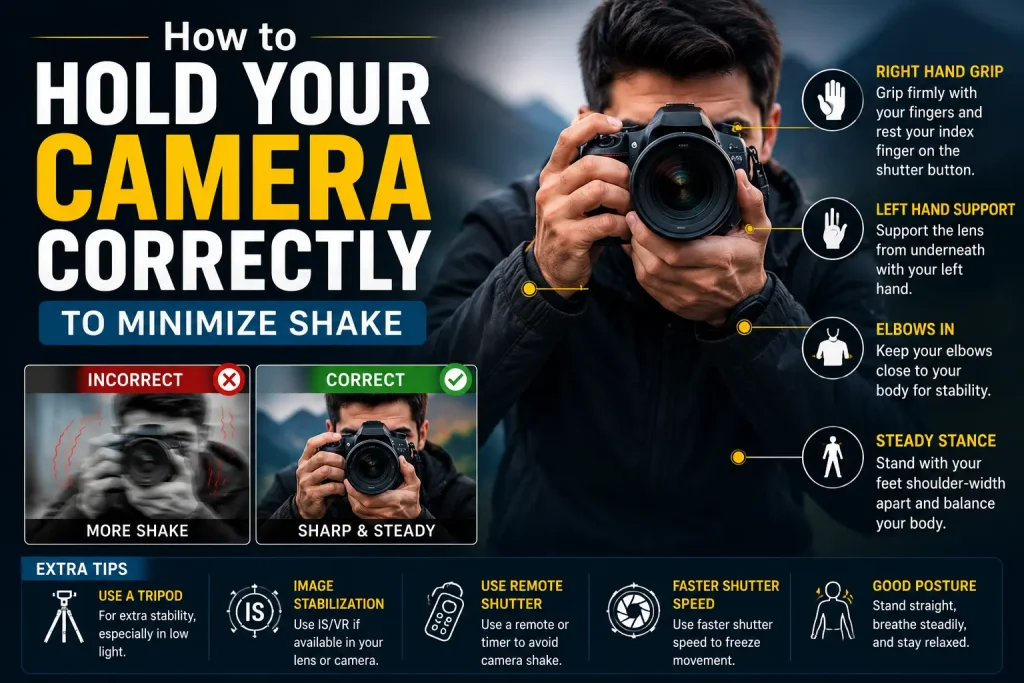
Before you change any camera setting or buy any gear, the single most effective thing you can do is improve how you physically hold your camera. Proper technique can give you two to three extra stops of handheld stability for free.
The Correct Camera Grip
- Right hand: Wrap firmly around the camera grip. Rest your index finger lightly on the shutter button without pressing.
- Left hand: Cup it beneath the lens barrel with your palm facing upward. Support the weight of the lens from underneath, never from the side.
- Elbows: Tuck both elbows tightly against your ribcage. This creates a rigid triangle between your arms and torso and dramatically reduces lateral sway.
- Viewfinder vs. LCD: Use the viewfinder whenever possible. Pressing the camera against your forehead adds a third contact point that further stabilizes your hold.
- Shoulders: Keep them relaxed. Hunching or tensing your shoulders actually transfers more vibration into your hands.
Stance and Body Position
- Stand with your feet shoulder-width apart and one foot slightly forward for balance.
- Bend your knees slightly. A locked knee position makes you sway more.
- Lean very slightly into the camera, not away from it.
- For low shots, kneel or sit on the ground and rest the camera on your knee.
- When possible, brace your body against a solid surface: a wall, tree, car door, fence post, or even a doorframe.
Breathing and Shutter Control
The way you breathe and press the shutter has a measurable effect on sharpness. Most photographers do not think about this, but it makes a real difference.
- Inhale normally, exhale halfway, then pause your breath. Press the shutter during that pause.
- Do not hold your breath completely. Full breath retention increases muscle tension and introduces micro-tremors.
- Use a rolling press: half-press the shutter to lock focus, then gently squeeze through to capture. Never jab the button.
- In burst mode, the middle frame of a short burst is statistically the sharpest because the initial button-press vibration has already settled.
The Camera Strap Tension Trick
This is a free, zero-equipment technique that many photographers overlook. Loop your camera strap around your neck and pull the camera outward until the strap goes taut. The tension creates counter-resistance that dampens forward and backward sway by up to two stops. It works especially well with wider lenses.
The String Monopod
Tie a length of cord to your camera’s tripod socket, step on the other end, and pull the camera upward until the cord is taut. The vertical tension mimics a monopod and can improve handheld stability by up to two stops. The total cost is under a dollar.
Camera Settings That Prevent Blur from Shaky Hands
Even perfect technique cannot overcome a shutter speed that is too slow for the situation. Your camera settings are your second line of defense.
Shutter Speed: The Most Important Setting
Shutter speed is the single most powerful tool you have against camera shake. Always prioritize it above aperture or ISO when shooting handheld.
- Follow the reciprocal rule as your baseline minimum
- When possible, double the reciprocal rule value as a safety margin (e.g. for a 100mm lens, target 1/200s rather than 1/100s)
- In challenging conditions, such as while walking, shooting from a vehicle, or with shaky hands, triple the reciprocal value
ISO: Do Not Be Afraid to Raise It
Many photographers make the mistake of keeping ISO low to avoid noise, then end up with a blurry image. A slightly noisy but sharp photo is always better than a clean but blurred one.
- Modern cameras can produce excellent results at ISO 1600 to 6400
- Most cameras today handle ISO 3200 very cleanly, and noise at ISO 6400 is often acceptable after post-processing
- A blurry low-ISO image cannot be fixed; a sharp high-ISO image can always have noise reduced
Aperture: Open Up to Let Light In
- Use wider apertures such as f/1.8, f/2, or f/2.8 in low light to enable faster shutter speeds
- Accept a shallower depth of field in exchange for the ability to use a faster shutter speed
- In bright light, aperture is less critical for preventing shake since shutter speed can already be high
Image Stabilization: Turn It On and Understand the Modes
Modern cameras and lenses offer various forms of image stabilization that can provide two to eight stops of additional handheld latitude. However, using them incorrectly can actually make things worse.
| System | Correction Range | Best Use | When to Turn Off |
| Lens OIS / VR | 3 to 4.5 stops | Telephoto, prime lenses | On a tripod |
| In-Body IS (IBIS) | 5 to 8 stops | Wide / standard lenses, video | When panning moving subjects |
| Hybrid (IBIS + OIS) | Up to 8+ stops | Low light, extreme telephoto | Rarely needed |
- Mode 1 (Normal): Use for static subjects and general handheld shooting
- Mode 2 (Panning): Use when tracking a moving subject horizontally. It stabilizes vertically but not horizontally, allowing smooth pans
- Always turn image stabilization off when using a tripod. Leaving it on during a static tripod shot can cause the stabilization system to hunt for movement and introduce its own blur
Use a Remote Shutter Release or Self-Timer
Even with perfect technique, pressing the physical shutter button introduces a tiny vibration. For static subjects on a tripod, eliminate this entirely.
- Use a wireless remote shutter release
- Use the camera’s built-in self-timer set to 2 seconds
- On smartphones connected to your camera, trigger the shutter from the app
Enable Electronic Front Curtain Shutter
Most modern mirrorless cameras offer an electronic front curtain shutter (EFCS). It eliminates the vibration caused by the mechanical first curtain of the shutter mechanism. Enable it in your camera menu for any handheld work where the subject is not fast-moving. This is an overlooked setting that can make a small but meaningful difference.
Gear That Reduces Camera Shake
Technique and settings take you far, but the right equipment removes the physical variable entirely for certain types of shooting.
Tripods
A tripod is the gold standard for maximum stability. It is essential for landscape photography, architecture, long exposures, product photography, and any situation where you want absolute sharpness.
- Carbon fiber tripods are lighter and absorb vibration better than aluminum, though they cost more
- Ball heads give you faster, more flexible positioning than pan-tilt heads
- Always hang your camera bag from the center column hook to add ballast and reduce vibration in wind
- Extend the thicker leg sections first and avoid fully extending the center column, as this reduces stability
Monopods
A monopod offers a middle ground between a tripod and freehand shooting. It gives you vertical stability and support while keeping you mobile. It is ideal for sports, wildlife, events, concerts, and wedding photography.
Gimbals and Stabilizers
For video work, a gimbal completely removes camera shake and allows smooth cinematic movement. For stills, gimbals are less necessary but useful for run-and-gun hybrid shooters.
Bean Bags
A bean bag is one of the most versatile and underrated pieces of photography support gear. Place it on a car window, fence, rock, or any surface and rest your camera on it for a perfectly stable, custom-shaped support. Wildlife photographers and travel photographers swear by them.
Camera Bodies with IBIS
If you shoot a lot of handheld work, choosing a camera body with in-body image stabilization is one of the best investments you can make. Current mirrorless cameras from Sony, Nikon, Canon, Fujifilm, and OM System offer IBIS systems that provide five to eight stops of compensation, which is transformative for low-light handheld photography.
Budget Alternatives That Actually Work
- A rolled-up jacket or backpack as a camera rest
- A wall, tree, or car bonnet as a brace
- A DIY string monopod made from cord and a carabiner (costs under one dollar)
- A small GorillaPod flexible tripod for improvised support on any surface
Genre-Specific Advice for Preventing Camera Shake
Portrait Photography
Most portrait shooters work with lenses between 50mm and 135mm. At these focal lengths, a shutter speed of 1/200s or faster is comfortable for handheld work. Use a wide aperture for the soft background, which also helps you maintain a fast shutter speed. If you are shooting in low light, raise your ISO before you slow your shutter speed.
Street Photography
Street photography is often fast, reactive, and done without a tripod. Keep your camera at eye level rather than using the rear LCD, which moves the camera further from your body. Use zone focusing or pre-focus to eliminate the delay caused by autofocus hunting, and set your shutter speed high enough to freeze both your movement and the subject’s.
Wildlife and Telephoto Photography
Long telephoto lenses magnify camera shake dramatically. A 400mm lens on a crop sensor behaves like a 600mm lens, meaning you need a shutter speed of at least 1/600s for reliable handheld sharpness, ideally 1/1000s or faster.
- Use a monopod or tripod with a gimbal head for heavy telephoto lenses
- Switch image stabilization to panning mode when tracking animals in motion
- Shoot in burst mode and select the sharpest frame
- Support the lens barrel on a bean bag, fence, or car window when stationary
Low-Light and Indoor Photography
Low-light situations force you to choose between a slow shutter speed, a high ISO, or a wide aperture. The correct priority for handheld work is always: shutter speed first, then aperture, then ISO last.
- At ISO 3200 to 6400, modern cameras produce noise that is easy to reduce in Lightroom or Capture One
- Use fast prime lenses with apertures of f/1.4 or f/1.8 in low light
- Look for ambient light sources, windows, neon signs, streetlights, to supplement available light
- Brace yourself against walls, doorframes, or furniture whenever you can
Landscape Photography
Landscape photography rarely requires handheld shooting. Use a tripod, a remote shutter release, and mirror lockup or electronic front curtain shutter for maximum sharpness. If you are shooting handheld to catch a fleeting moment of light, use a wide-angle lens and a shutter speed of at least 1/125s.
Photography with Essential Tremor or Medical Conditions
If you have a diagnosed tremor, such as benign essential tremor or Parkinson’s-related tremor, you face additional challenges. But these challenges do not prevent you from producing professional-quality photography. Many working photographers manage tremors successfully with the right approach.
What Is Essential Tremor?
Essential tremor is a neurological condition that causes involuntary rhythmic shaking, most commonly in the hands. It is distinct from Parkinson’s tremor, which typically occurs at rest, whereas essential tremor is more pronounced during intentional movement. It affects roughly one in twenty-five people over the age of forty.
Practical Strategies for Photographers with Tremors
- Maintain shutter speeds of 1/250s or faster as your default handheld minimum
- Invest in a camera body with a strong IBIS system and pair it with optically stabilized lenses
- Use a tripod or monopod for the majority of your shooting
- Shoot in burst mode and review frames carefully. Even with a tremor, some frames in a burst will be acceptably sharp
- Use remote shutter releases to avoid adding any additional movement at the moment of capture
- Use AI-powered sharpening software in post-processing to recover slightly soft frames
- Shoot wider focal lengths when possible, as they are more forgiving of hand movement than telephotos
Lifestyle Factors That Affect Tremor Severity
Several lifestyle and dietary factors can make hand tremors noticeably worse. If you know you have a shoot coming up, consider the following in the days and hours before:
- Reduce or eliminate caffeine, which is a stimulant that increases tremor severity
- Stay well hydrated, as dehydration worsens tremor
- Get adequate sleep, since fatigue amplifies hand instability
- Manage stress levels, as anxiety makes tremors worse
- Avoid alcohol before shooting. While alcohol can temporarily reduce tremor, the rebound effect worsens it
If your tremor is severe enough to significantly affect your daily life or career, consult your doctor. There are medications, such as beta-blockers, and therapies that can help. Always seek medical advice before starting or stopping any medication.
Physical Training and Exercises to Build Handheld Stability
This is one of the most important sections that almost no competitor article covers in any meaningful depth. Camera stability is a physical skill, and like any physical skill, it can be trained and improved with deliberate practice.
Why Hand Stability Is Trainable
Handheld stability depends on the strength and endurance of your forearm muscles, wrist stabilizers, and shoulder girdle muscles. It also depends on neuromuscular control, the brain’s ability to send precise signals to fine motor muscles. Both improve significantly with consistent targeted practice.
Daily Exercises (5 to 10 Minutes)
- Dry-fire drill: Dry-fire drill: Hold your camera at eye level in proper shooting stance. Practice pressing the shutter button smoothly without capturing. Focus on keeping the viewfinder perfectly still. Do 20 repetitions twice daily.
- Shutter speed threshold testing: Shutter speed threshold testing: Shoot a high-detail static subject at progressively slower shutter speeds, from 1/125s down to 1/30s. Review at 100 percent magnification. Identify your personal sharpness threshold, then work to push it lower over time.
- Camera hold isometric: Camera hold isometric: Hold your camera up in shooting position without taking a photo. Hold for 30 seconds. Rest. Repeat five times. This builds the endurance muscles in your forearms and shoulders.
- Wrist stability circles: Wrist stability circles: Hold your arm straight out with a closed fist. Rotate your wrist in slow, controlled circles. 10 clockwise, 10 counterclockwise, each arm. This improves wrist stabilizer strength.
- Finger independence exercises: Finger independence exercises: Place your hand flat on a table and lift each finger individually 10 times. This improves fine motor control, which directly reduces the micro-tremors that cause camera shake.
- Wall press drill: Wall press drill: Stand near a wall, press your camera against your eye and the back of your hand lightly against the wall. Practice firing the shutter with the wall as a stabilizer, then gradually reduce your reliance on it over weeks.
Consistency Matters More Than Duration
Ten minutes of deliberate daily practice will improve your handheld sharpness more than an occasional hour-long practice session. Most photographers see a measurable improvement in their personal handheld shutter speed threshold within three to four weeks of consistent training.
How to Fix Mildly Blurry Photos in Post-Production

Prevention is always better than correction. But when a slightly soft image is worth salvaging, modern software can help.
Adobe Lightroom and Camera Raw
The Detail panel in Lightroom offers sharpening and noise reduction. Use the masking slider to restrict sharpening to edges only, which prevents the halos and texture amplification that appear when you sharpen flat areas. Keep the radius between 0.5 and 1.0 for camera shake; higher values make blur artifacts more visible.
Topaz Sharpen AI
Topaz Sharpen AI is the most effective dedicated tool for recovering motion blur and camera shake in still photography. It uses machine learning to analyze the specific type of blur in your image and reconstruct edge detail with impressive accuracy. It works best on mild-to-moderate shake and produces noticeably better results than standard unsharp masking. It is a paid application but worth the investment if sharpness recovery is important to your workflow.
Adobe Photoshop Shake Reduction Filter
Photoshop includes a dedicated Shake Reduction filter under Filter > Sharpen > Shake Reduction. It is less effective than Topaz Sharpen AI for most use cases, but it is free within the Creative Cloud subscription and can recover mild camera shake in images where Lightroom sharpening is insufficient.
Limitations of Post-Processing Recovery
- Severe directional blur cannot be fully reconstructed. Software interpolates but does not recreate missing optical data.
- Out-of-focus blur is different from camera shake blur and responds differently to sharpening tools.
- Heavy subject motion within a shake-blurred frame compounds the problem and limits recovery.
- Always view images at 100 percent magnification on a calibrated monitor before deciding whether to attempt recovery.
Common Mistakes That Make Camera Shake Worse
Even photographers who know the basics often make these mistakes. Avoiding them will immediately improve your handheld sharpness.
- Shooting with both arms extended and elbows out: This is the single worst thing you can do. Always tuck your elbows.
- Using the LCD screen instead of the viewfinder: The LCD holds the camera further from your body and removes a contact stabilization point.
- Leaving image stabilization on during tripod shooting: This causes the IS motor to hunt for movement and can introduce its own blur.
- Relying too heavily on post-processing recovery: It has limits, and a little extra attention to technique costs nothing.
- Jabbing the shutter button: Always squeeze smoothly through a half-press to a full-press.
- Ignoring caffeine and fatigue: Both increase hand tremor measurably.
- Not reviewing shots at 100 percent: You cannot evaluate sharpness at the thumbnail or preview size.
Quick Pre-Shoot Checklist for Sharp Handheld Photos
Use this checklist before any handheld shooting session to maximize your chances of sharp results.
- Set shutter speed to at least 1 divided by focal length (doubled if in challenging conditions)
- Enable image stabilization and confirm the correct mode for your shooting scenario
- Tuck elbows against your ribcage and cup the lens from underneath with your left hand
- Use the optical viewfinder rather than the rear LCD
- Find something solid to brace against if available
- Half-press to focus, exhale halfway, pause, then squeeze the shutter smoothly
- Shoot in burst mode at marginal shutter speeds and choose the sharpest frame
- Review at 100 percent magnification before leaving the location
- If on a tripod, turn image stabilization off and use a remote trigger or self-timer
Frequently Asked Questions
Best shutter speed to avoid camera shake?
Start with 1 / focal length (35mm equivalent).
For safer handheld shots, use double this value, and in tough conditions or tremor cases, triple it.
Does image stabilization replace good technique?
No. Stabilization only reduces shake.
Good grip, posture, and breathing technique are still essential. It only gives extra safety, not full control.
Can I take sharp photos with a medical tremor?
Yes. Use:
Fast shutter speeds
IBIS/OIS cameras
Burst mode
Tripod/monopod when possible
Also help: good sleep, low caffeine, hydration.
Should I always use a tripod to avoid camera shake?
Not always.
Use tripod: landscapes, studio, long exposure, static scenes
Handheld: events, street, travel, moving subjects
Does a heavier camera help reduce shake?
Not really.
Heavier cameras may reduce small vibrations but increase fatigue, which can cause more shake. Balance and ergonomics matter more than weight.
Difference between camera shake and motion blur?
Camera shake: whole image is blurry (camera moved)
Motion blur: only moving objects are blurred (subject moved)
Conclusion
Fixing shaky hands in photography is not about buying expensive gear or having naturally steady hands. It is about understanding why camera shake happens and systematically addressing each cause with the right technique, settings, and support.
Start with your grip and stance, which cost nothing and make an immediate difference. Set your shutter speed correctly and do not be afraid of higher ISO values. Use image stabilization properly, know when to turn it off, and invest in a tripod for situations that demand maximum sharpness.
If you have a medical tremor, adjust your workflow rather than your ambitions. Modern cameras, stabilization technology, and AI-powered post-processing tools mean that a tremor does not prevent you from producing professional-quality images. Finally, treat handheld stability as a physical skill and train it deliberately. Ten minutes of daily practice will produce measurable improvements within a month. Sharp photos are within your reach, every time you pick up the camera.
You May Also Like It:
I Have Sensitive Skin. How Gentle Are Nivea’s Creams Compared to Aveeno?
My Son Can’t See How Do I Explain Colours to Him?
Compare Corbett and Ranthambore for a 5-Day Wildlife Photography Trip in November on a 50K Budget